Your car’s air intake system plays a pivotal role in ensuring your engine performs at its best. By delivering clean, oxygen-rich air to the combustion chambers, it optimizes fuel burning, boosts efficiency, and can even enhance horsepower—especially with a high-performance upgrade. Whether you’re replacing a worn-out stock intake or installing a sleek aftermarket cold air intake, this comprehensive guide will walk you through every step of the process. With some basic tools, a bit of patience, and a methodical approach, you can tackle this DIY project without needing a mechanic. Let’s dive into everything you need to know to get the job done right.
Understanding the Air Intake System
Before jumping into the installation, it’s worth understanding what the air intake system does and why it matters. The system consists of components like the air filter, airbox, intake tubing, and sometimes a mass airflow (MAF) sensor. Its primary job is to filter incoming air, removing dust and debris, and deliver it to the throttle body, where it mixes with fuel for combustion. Over time, a stock intake can become restrictive or clogged, reducing airflow and hampering performance. Upgrading to a cold air intake, which draws cooler air from outside the engine bay, can improve power by increasing air density. Whether your goal is maintenance or performance, a proper installation is key to reaping the benefits.
Tools and Materials Needed
Preparation is half the battle when it comes to automotive DIY projects. Having the right tools and materials on hand ensures a smooth process and prevents frustrating delays. Here’s a detailed list of what you’ll need:
-
- New Air Intake System: Choose either a stock replacement or an aftermarket cold air intake. Confirm compatibility with your car’s make, model, and year—check the manufacturer’s specs or consult your vehicle’s manual. Aftermarket kits often include additional components like heat shields or brackets.
-
- Screwdrivers: A flathead and Phillips screwdriver are essential for loosening clamps, screws, or small fasteners. Keep multiple sizes handy, as clamp designs vary.
-
- Socket Wrench Set: Used for removing and tightening bolts, especially on the airbox or throttle body connections. A set with metric and standard sizes covers most vehicles.
-
- Pliers: Needle-nose pliers are ideal for gripping and removing stubborn clamps or disconnecting vacuum hoses without damaging them.
-
- Adjustable Wrench: This versatile tool handles various bolt sizes and is perfect for tight spaces where a socket wrench won’t fit.
-
- Ratchet and Extension Bars: These help you reach bolts tucked deep in the engine bay, saving time and effort.
-
- Hose Clamps: Have a few extras in case the ones provided with your kit don’t fit perfectly or if the old ones are worn out.
-
- Torque Wrench: Optional but highly recommended for precision. Over-tightening can crack plastic components, while under-tightening risks leaks—check your car’s torque specs if using one.
-
- Work Gloves and Safety Goggles: Protect your hands from sharp edges and your eyes from dust or debris kicked up during the process.
-
- Clean Rag or Shop Towel: Useful for wiping dirt off the throttle body, intake components, or your hands as you work.
-
- Automotive-Safe Cleaner: A throttle body cleaner or degreaser keeps components spotless and ensures optimal airflow. Avoid harsh chemicals that could damage rubber or plastic parts.
-
- Zip Ties or Hose Securing Bands: These tidy up loose wires or hoses, preventing them from rubbing against moving parts or hot surfaces.
Gather everything in a well-lit workspace before starting—this small step saves big headaches later.
Step 1: Prepare Your Vehicle
Proper preparation sets the stage for a safe and efficient installation. Here’s how to get your car ready:
Park on a Level Surface
Find a flat spot to park your vehicle—garages or driveways work best. A level surface prevents the car from rolling or shifting while you’re under the hood. Engage the parking brake firmly and, if you’re extra cautious, place wheel chocks behind the tires for added stability.
Turn Off the Engine and Cool Down
Never work on a hot engine. After your last drive, let the car sit for at least 30 minutes to cool down. Hot metal can burn your skin, and heat-sensitive components like sensors might be more fragile when warm. Patience here pays off in comfort and safety.
Disconnect the Battery
Safety first: disconnect the negative battery terminal to eliminate the risk of electrical shorts or the engine starting unexpectedly. Locate the battery (usually under the hood, sometimes in the trunk), and use an adjustable wrench or socket to loosen the negative (-) terminal clamp. Pull it off and tuck it aside, ensuring it doesn’t touch metal surfaces—this keeps the circuit open.
Organize Your Workspace
Lay out your tools and the new intake system nearby. A magnetic tray or small bins can keep screws and clamps from rolling away. If you’re working outdoors, a tarp or mat under the car protects dropped parts from dirt. A tidy setup keeps you focused and efficient.
Step 2: Remove the Old Air Intake System
With your car prepped, it’s time to take out the old system. This step requires careful attention to avoid damaging reusable components.
Locate the Air Intake System
Pop the hood and find the air intake assembly. It typically starts at the air filter housing (a plastic box near the engine) and extends via tubing to the throttle body—a metal or plastic component attached to the engine. Some setups include a MAF sensor along the tubing, identifiable by its wiring harness.
Unplug Sensors and Hoses
Start by disconnecting any electrical sensors:
-
- MAF Sensor: If present, gently press the clip on its connector and pull it free. Avoid yanking the wires—use steady, even pressure to prevent damage.
-
- Vacuum Hoses: Look for small rubber hoses attached to the intake tubing. Squeeze their clamps with pliers and slide them off. If multiple hoses are involved, label them with tape and a marker (e.g., “top port,” “side port”) for easy reassembly later.
Loosen Clamps and Bolts
Next, free the intake from its mounts:
-
- Use a screwdriver or socket wrench to loosen the clamps where the intake tube meets the throttle body. Turn counterclockwise until the clamp slides freely.
-
- Check the air filter housing (airbox) for bolts or screws securing it to the engine bay. Remove these with the appropriate tool, keeping fasteners in a safe spot—you might reuse them.
Remove the Airbox and Tubing
-
- Lift the airbox out, along with the old air filter. It may require a gentle wiggle if clips or snug fittings hold it in place.
-
- Disconnect and remove the intake tubing. If it’s stuck, twist it slightly to break any suction or grime seal.
-
- If your system has a heat shield (common with performance intakes), unscrew and remove it too.
Inspect and Clean
Before moving on, peek at the throttle body’s opening. If you see dirt or carbon buildup, spray it with throttle body cleaner and wipe it with a rag. A clean throttle body ensures smooth airflow and prevents contaminants from entering the engine with the new intake.
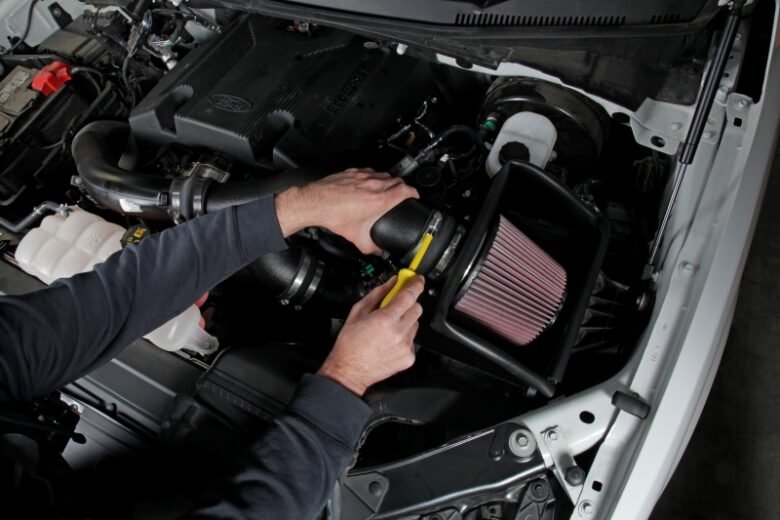
Step 3: Install the New Air Intake System
Now comes the fun part—putting in the new system. Take your time to ensure everything fits perfectly.
Position the New Intake Tube
-
- Hold the new intake tube up to the throttle body and align it as the old one was. Match its shape and routing to the original path.
-
- For cold air intakes, the tube might extend lower or toward the front of the engine bay to pull in cooler air. Check the kit’s instructions—some require brackets or adapters for proper positioning.
Connect the MAF Sensor and Hoses
-
- MAF Sensor: Plug the sensor’s connector back in, ensuring it clicks securely. Route the wiring away from hot or moving parts.
-
- Vacuum Hoses: Reattach hoses to their ports on the new tube. If the design differs from the stock setup, consult the manual—mismatched connections can confuse the engine’s computer and trigger a check engine light.
Secure the Air Intake Tube
-
- Slide the provided hose clamps over the tube ends and connect it to the throttle body. Tighten the clamps with a screwdriver or wrench until snug—stop before you feel resistance to avoid cracking the tube or warping the throttle body.
-
- If brackets are included, bolt them to the designated spots in the engine bay for stability.
Install the Air Filter
-
- Attach the new air filter to the end of the intake pipe. Secure it with a clamp, ensuring no gaps where unfiltered air could sneak in.
-
- Position the filter for maximum airflow—away from hot engine components. If a heat shield is part of the kit, install it now to insulate the filter from engine heat, enhancing performance.
Double-Check All Connections
-
- Tug lightly on the tube, filter, and hoses to confirm they’re secure. Tighten any loose clamps or bolts.
-
- Use zip ties to bundle any dangling wires or hoses, keeping them clear of belts, fans, or exhaust parts.
Step 4: Reconnect the Battery and Test the Installation
You’re almost done—time to power up and test your work.
Reconnect the Negative Battery Terminal
-
- Place the negative terminal back on the battery post and tighten it with a wrench. Ensure it’s firm but not stripped—a loose connection can cause electrical gremlins.
Start the Engine
-
- Turn the key or press the start button and let the engine idle for 3-5 minutes. This gives the ECU time to recalibrate airflow readings with the new intake.
-
- Listen carefully: hissing might mean an air leak, while rattling could indicate a loose part. Shut off the engine and address any issues immediately.
Check for Air Leaks
-
- Gently wiggle the intake components. They should feel solid. If anything shifts, tighten it up. Leaks let unfiltered air into the engine, reducing efficiency and risking damage.
Step 5: Test Drive and Final Inspection
The real proof is in the driving—take it for a spin.
Take the Car for a Short Drive
-
- Start with a gentle cruise around the block. Gradually accelerate to feel the throttle response— it should feel crisper with a new intake.
-
- Keep an ear out for odd noises like whining or popping, which could signal a problem.
Monitor Performance
-
- A well-installed intake often delivers smoother acceleration and, with some upgrades, better fuel economy. Note any changes over a few drives.
-
- If the check engine light pops on, recheck the MAF sensor and hose connections—loose fittings are common culprits.
Maintenance Tips for Your New Air Intake System
To keep your intake performing like new, follow these habits:
Regularly Check the Air Filter
-
- Inspect it every 10,000-15,000 miles (or per the manufacturer’s advice). A dirty filter restricts airflow, so clean reusable filters with a kit or replace disposable ones.
Inspect for Loose Connections
-
- Every few months, peek under the hood. Tighten clamps and check hoses for cracks—small leaks can snowball into bigger issues.
Clean the Intake Tube
-
- Wipe it down with a damp rag to remove dust or oil buildup. A clear path ensures peak airflow.
Monitor Engine Performance
-
- If power dips or you hear unusual sounds, investigate the intake for clogs, leaks, or filter issues. Quick fixes now prevent costly repairs later.
Conclusion
Installing or replacing your car’s air intake system is a rewarding DIY task that can breathe new life into your vehicle. Whether you’re sticking with a stock setup or boosting performance with a cold air intake, this step-by-step guide equips you to do it confidently—no mechanic required. With the right tools, careful installation, and routine maintenance, your engine will run smoother, stronger, and more efficiently for years. Take pride in your work, hit the road, and enjoy the gains you’ve earned.