
Changing your engine oil might sound intimidating, but it’s one of the easiest and most rewarding DIY car maintenance tasks you can do at home. Fresh oil keeps your engine running smoothly by lubricating parts, cooling components, and trapping dirt. Over time, oil gets dirty and breaks down, so checking it regularly and replacing it when needed is key to avoiding costly repairs. With a few tools and some know-how, you can handle this job yourself—no mechanic required!
This guide walks you through every step of checking and replacing your engine oil, breaking it down into simple, manageable tasks. We’ll cover what you need, how to do it, and tips to make it a breeze. Whether you’re a first-timer or just brushing up on the basics, you’ll find everything here to get the job done right. Let’s roll up our sleeves and get started!
Why DIY Oil Maintenance?
Doing your own oil checks and changes saves money (shops charge $30-$100!), gives you control over your car’s care, and teaches you a practical skill. Plus, it’s satisfying to know you’re keeping your engine humming. Oil lubricates, cools, and cleans your engine, but it wears out with use. By mastering this DIY process, you’ll ensure your vehicle stays reliable mile after mile.
How Often Should You Do This?
-
- Check Your Oil: Once a month or before a long drive. It’s a 5-minute task that spots problems early.
-
- Change Your Oil: Every 5,000-7,500 miles for conventional oil, or 7,500-10,000 miles for synthetic—check your owner’s manual for your car’s exact needs. Driving in tough conditions (short trips, hot weather, towing) might mean changing it sooner.
Keep your manual handy—it’s your go-to for specifics like oil type and mileage intervals.
What You’ll Need for This DIY Project
Before you start, gather these items. Having them ready keeps the process smooth and stress-free.
For Checking Oil
-
- Clean rag or paper towels
For Changing Oil
-
- New Engine Oil: Match the type (e.g., 5W-30) and amount (4-6 quarts) to your manual.
-
- Oil Filter: Get one made for your car—check the manual or ask at the store.
-
- Wrench: For the drain plug (usually 13mm or 17mm—check your car).
-
- Oil Filter Wrench: To remove the old filter.
-
- Drain Pan: To catch old oil (6-quart capacity or more).
-
- Funnel: For neat oil pouring.
-
- Jack and Jack Stands: To lift the car (or use ramps).
-
- Gloves: To stay clean and safe.
-
- Rags or Paper Towels: For messes.
-
- Sealed Container: For old oil disposal (like an empty jug).
Optional Extras:
-
- Wheel chocks (to stop rolling).
-
- Torque wrench (for precise tightening).
Part 1: DIY Steps to Check Your Engine Oil
Checking your oil is a quick DIY habit that tells you if it’s low or dirty. Here’s how to do it step by step.
Step 1: Set Up Your Car
-
- Park on flat ground for an accurate dipstick reading.
-
- Turn off the engine. If it was just running, wait 5-10 minutes for the oil to settle.
-
- Pop the hood and prop it open.
Step 2: Find the Dipstick
-
- Look for a long rod with a colorful handle (yellow or orange) near the engine’s front. Check your manual if you’re lost—it’s your map!
Step 3: Clean the Dipstick
-
- Pull the dipstick out by the handle.
-
- Wipe it with a rag or paper towel to clear off old oil. A clean start means a true reading.
Step 4: Measure the Oil Level
-
- Slide the dipstick back into its tube all the way, then pull it out again.
-
- Check the oil mark against the dipstick’s lines (like “L” for low and “F” for full).
-
- It should be between the lines. Too low? Add oil. Too high? See a pro—it might mean trouble.
Step 5: Look at the Oil’s Condition
-
- Study the oil on the dipstick:
-
- Clean: Light amber, smooth, clear.
-
- Dirty: Dark, thick, or gritty—time for a change!
-
- Weird: Milky or foamy? Stop driving and get help (could be coolant mixing in).
-
- Study the oil on the dipstick:
-
- Sniff it. Burnt smells mean it’s breaking down.
Step 6: Decide Your Next Move
-
- Low but clean? Add a little oil (same type as what’s in there).
-
- Dirty or overdue? Move on to the oil change steps below.
Part 2: DIY Steps to Replace Your Engine Oil
Ready to swap out that old oil? This DIY oil change takes about 45 minutes and feels great when you’re done. Follow these steps carefully.
Step 1: Prep Your Workspace
-
- Collect all your tools and materials—double-check the oil and filter match your car.
-
- Park on a level spot and set the parking brake.
Step 2: Lift the Car Safely
-
- You’ll need to get under the car, so lift it:
-
- Use a jack to raise the front, then slide jack stands under for support. Never work under a car held only by a jack—it can fall!
-
- Or, drive onto ramps if you have them.
-
- You’ll need to get under the car, so lift it:
-
- If it’s been off for hours, run the engine 5 minutes to warm the oil (it drains easier)—but let it cool 15-30 minutes after so it’s not scalding.
Step 3: Drain the Old Oil
-
- Find the oil drain plug under the engine (it’s on the oil pan—your manual can point it out).
-
- Slide your drain pan right under it.
-
- Grab your wrench, turn the plug counterclockwise to loosen it, then unscrew it by hand. Oil will rush out—keep your hands clear!
-
- Let it drain fully (5-10 minutes). Adjust the pan if it starts missing the flow.
Step 4: Take Off the Old Filter
-
- Spot the oil filter—usually a cylinder near the engine block.
-
- Move the drain pan under it to catch drips.
-
- Use your oil filter wrench to turn it counterclockwise. It might resist—keep steady pressure till it loosens.
-
- Once off, check the old filter’s rubber gasket came with it. If it’s stuck on the engine, peel it off for a clean seal later.
Step 5: Put On the New Filter
-
- Open your new filter and rub a thin layer of fresh oil on its rubber gasket with your finger—it helps it seal and come off easier next time.
-
- Screw it on by hand, turning clockwise until it’s snug against the engine.
-
- Give it a quarter- to half-turn more with the wrench—just enough, not too tight!
Step 6: Reattach the Drain Plug
-
- Wipe the plug and the area around the hole with a rag.
-
- Screw the plug back in by hand, then tighten it with your wrench. If you’ve got a torque wrench, use the manual’s setting (often 25-35 ft-lbs).
-
- Tug gently to make sure it’s not loose—no leaks allowed!
Step 7: Lower Your Car
-
- If you jacked it up, lift it slightly with the jack, pull out the stands, and ease it down slowly.
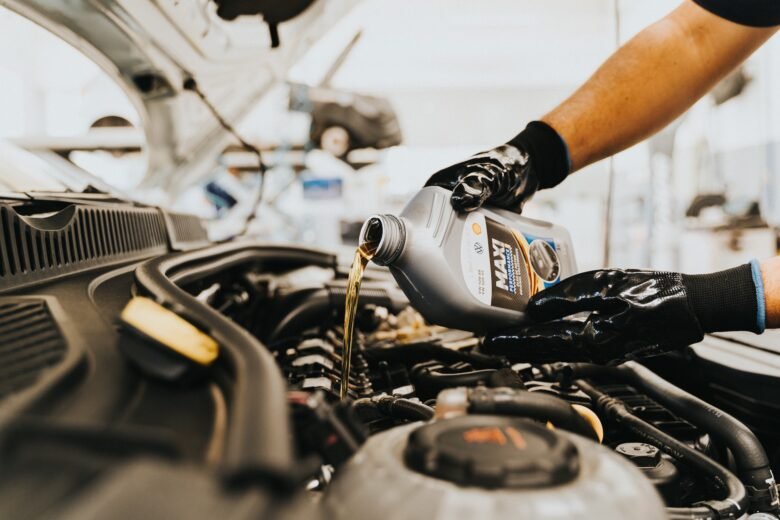
Step 8: Pour in Fresh Oil
-
- Pop the hood again and find the oil filler cap (look for an oil can symbol).
-
- Twist it off and set a funnel in the hole.
-
- Pour in most of the new oil—say, 4.5 quarts if your car takes 5 (check the manual). Go slow to avoid overfilling.
-
- Put the cap back on tight.
Step 9: Verify the Oil Level
-
- Wait 2-3 minutes for the oil to settle.
-
- Pull the dipstick, wipe it, dip it again, and check the level (like in Part 1).
-
- Add a bit more oil if it’s below “full”—small pours, check again, until it’s just right.
Step 10: Test for Leaks
-
- Start the engine and let it run 2-3 minutes.
-
- Shut it off, then peek underneath. Drops near the plug or filter? Tighten them a touch and recheck.
-
- No leaks? You’re golden!
Step 11: Clean Up Like a Pro
-
- Wipe any spills with rags.
-
- Pour the old oil from the pan into a sealed container (an old oil jug works great).
-
- Don’t toss it—take it to a recycling spot (auto stores or centers often take it free).
DIY Tips to Nail It
-
- Stay Organized: Keep tools in a bucket labeled “oil change.”
-
- Track It: Jot down the date and mileage after each change.
-
- Warm Is Good: Slightly warm oil flows out better—just don’t burn yourself.
-
- Check Twice: Make sure the plug, filter, and cap are snug before you drive.
-
- Spend Smart: Synthetic oil costs more but lasts longer—worth it for some cars.
DIY Pitfalls to Dodge
-
- Overfilling: Too much oil can mess up your engine—stick to the “full” mark.
-
- Wrong Stuff: Use the oil and filter your manual calls for—no guesses!
-
- Old Filter: Skipping it clogs things up—always swap it.
-
- Shaky Car: Jack stands or ramps are a must—don’t trust a jack alone.
-
- Leaks: Don’t ignore drips—fix them fast.
DIY Troubleshooting
-
- Oil Drops Fast: Check for leaks under the car or blue smoke from the tailpipe—might need a pro.
-
- Dirty Too Soon: If it’s black right after a change, something’s off—get it checked.
-
- Noisy Engine: Louder after? Recheck the level and oil type.
Wrap-Up: You’ve Got This!
By following these DIY steps, you’re not just checking and changing oil—you’re taking charge of your car’s health. Start with a quick oil check today to get comfy with the dipstick. When it’s time for a change, carve out an hour, grab your gear, and dive in. You’ll save cash, learn a ton, and keep your engine purring. Happy wrenching!


