When your car’s headlights turn cloudy, yellow, or dim, it’s more than just a cosmetic issue—it’s a safety hazard. Those hazy lenses cut down the light reaching the road, making nighttime driving riskier than it should be. Fortunately, you don’t need to shell out hundreds for new headlights or a shop fix. With some basic tools, a couple of hours, and this DIY guide, you can restore them at home and bring back their brilliance. In this 2000+ word article, I’ll take you through every step of checking and fixing your headlights, explaining each part in detail so even first-timers feel confident. You’ll save money, boost safety, and enjoy the pride of doing it yourself—let’s get started!
Why Headlight Restoration Matters
Headlights are your car’s lifeline in the dark, illuminating roads, signs, and obstacles so you can drive with confidence. Most modern headlights are made of polycarbonate plastic—a tough, lightweight material—coated with a thin layer of UV protection. Over time (think 3–5 years or more, depending on sun exposure), that coating wears off from UV rays, rain, road salt, and grime. Once exposed, the plastic oxidizes, turning yellow or cloudy and scattering light instead of focusing it.
Here’s why this matters:
-
- Safety First: Hazy lenses can reduce light output by 50–75%. Imagine driving through fog with half the visibility—that’s what bad headlights do every night.
-
- Cost Savings: New headlights cost $100–$500 each, plus installation. Restoration? Just $10–$25 for supplies you might already have.
-
- Better Looks: Clear headlights make your car look newer and well-cared-for, like a fresh coat of paint without the hassle.
-
- Legal Stuff: In some states, dim or cloudy headlights fail inspections or earn you a ticket—why risk it?
This DIY restoration tackles oxidation and haze, not cracks or burned-out bulbs (those need replacement). It’s a practical fix that works for most cars with plastic lenses—rare glass headlights (vintage models) need a pro. Ready to see the light?
Tools and Materials You’ll Need
You don’t need a fancy garage setup—just everyday items or a cheap headlight restoration kit. Here’s a detailed breakdown, with why each tool matters and how to use it:
-
- Masking Tape: This protects your car’s paint from accidental sanding or polish splatter. Painter’s tape (blue or green) sticks well but peels off cleanly—get a 1-inch roll from a hardware store. You’ll use it to create a border around the headlight.
-
- Soap and Water: A simple mix of dish soap and warm water cleans off dirt, bugs, and grease before you start. Any household soap works—grab a bucket or bowl and a sponge or cloth. Clean lenses mean better sanding results.
-
- Microfiber Cloths or Rags: These soft cloths are perfect for washing, drying, and polishing without scratching the plastic. Old T-shirts work too, but microfiber (from auto or home stores) grabs dust better. You’ll need 3–4: one for washing, one for alcohol, one for polish.
-
- Sandpaper (Wet/Dry): Wet/dry sandpaper in grits like 800, 1000, and 2000 smooths out haze. Lower numbers (800) are coarse for heavy yellowing; higher ones (2000) refine the surface. A $5 variety pack from a hardware store covers it—cut sheets into palm-sized pieces.
-
- Water Spray Bottle or Bucket: Wet sanding needs water to lubricate the sandpaper, reducing scratches and dust. A $1 spray bottle (like for plants) lets you mist as you go, or dip paper in a bucket. Either keeps the process smooth.
-
- Rubbing Alcohol: This cuts through sanding dust and grease after sanding. Get 70% isopropyl from a drugstore—pour it on a cloth to wipe down the lens. It dries fast, leaving no residue for polishing.
-
- Polishing Compound: This paste buffs the lens clear after sanding. Automotive polish (like Turtle Wax) or a headlight kit’s compound works—grab a $5 tube. It’s like wax for clarity, smoothing tiny scratches.
-
- UV Sealant or Clear Coat: This locks in your work, shielding plastic from UV damage. Kits include wipe-on sealant; otherwise, buy UV-resistant clear coat spray (auto store, $8). Without it, haze creeps back in months.
-
- Screwdriver (Flathead or Phillips): Some headlights need removal for full access—check your car (e.g., a few screws on top). Most don’t, but have a basic screwdriver ready just in case.
-
- Safety Gear: Gloves keep your hands dry and chemical-free (latex or nitrile, $5 a pack). Safety glasses ($3) block sanding dust from your eyes. A mask (even a bandana) stops you breathing fine particles—comfort and health matter.
Optional Extras:
-
- Headlight Restoration Kit: A $10–$25 kit (e.g., 3M, Meguiar’s) bundles sandpaper, polish, and sealant—convenient and foolproof. Great if you want everything in one box.
-
- Power Drill with Polishing Pad: Speeds up polishing with a foam pad attachment ($10–$15). Not essential, but cuts effort—use low speed to avoid heat damage.
-
- Shop Towels: Disposable paper towels sop up spills or greasy hands—handy for a messy job.
DIY Hacks:
-
- Toothpaste: Non-gel toothpaste acts as a mild abrasive for light haze—cheap but less effective long-term.
-
- Baking Soda + Vinegar: A paste of these kitchen staples scrubs minor cloudiness—mix, apply, rinse.
Total cost? $10–$25 with a kit, or less if you scrounge supplies. A shop charges $100–$200—this is a steal.
Preparation: Setting Up for Success
Before you touch the headlights, prep like a pro to avoid hiccups:
-
- Park in Shade: Direct sunlight dries wet sanding too fast, leaving streaks, and bakes polish into a mess. A garage, carport, or shady tree works—cloudy days are gold. If stuck in sun, work fast and keep water handy.
-
- Gather Your Supplies: Lay everything out—tape roll, soap bucket, sandpaper pack, etc.—on a table or the ground nearby. Check quantities: enough tape to circle both lights, three grits of sandpaper, a full polish tube. Missing stuff mid-job kills momentum.
-
- Check Your Headlights: Examine each lens up close. Yellow haze or cloudiness? This fix works. Deep cracks, burn marks, or foggy insides (water trapped)? Restoration won’t help much—those need new units or pro repair. Know your limits.
-
- Wear Safety Gear: Slip on gloves—wet sanding and polish get sloppy. Pop on safety glasses—dust flies when sanding. Tie a mask or scarf over your nose/mouth—fine plastic particles aren’t fun to breathe. You’re protected and ready.
Step-by-Step Guide to Headlight Restoration
We’ll assess the damage first, then restore step-by-step. This works for plastic headlights (most cars post-1990s)—glass ones need specialty care. Do one light at a time to stay focused.
Part 1: Check the Headlights
Know what you’re fixing before you start:
Step 1: Inspect the Damage
-
- Look and Feel: Shine a flashlight on the lens—yellow or hazy patches scatter light unevenly. Run your fingers over it—rough or gritty means oxidation’s deep. Smooth but cloudy? It’s surface-level—easier fix.
-
- Night Test: At dusk, turn on the headlights and aim at a wall or garage door (10–20 feet away). Dim, spotty beams confirm haze is blocking light—compare to a friend’s car if unsure.
-
- What It Means: Light haze (faint yellow) takes less sanding; heavy haze (opaque or pitted) needs more grits. Cracks or internal fog? Stop here—restoration won’t cut it.
Part 2: Restore the Headlights
Here’s the full fix, explained in detail:
Step 2: Clean the Headlights
-
- Mix and Scrub: Fill a bucket with warm water and a squirt of dish soap—bubbles mean it’s working. Dip a microfiber cloth or sponge and scrub each lens hard, focusing on grimy spots (bugs, tar). Takes 2–3 minutes per light.
-
- Rinse Off: Spray with a hose or spray bottle—clean water washes away soap and loose dirt. No streaks—soap film clogs sandpaper later.
-
- Dry It: Wipe with a fresh microfiber cloth until bone-dry. Check for leftover grime—repeat if needed.
-
- Why It Matters: Dirt hides haze depth and scratches sandpaper, making uneven results. Clean lenses start you right.
Step 3: Tape Off the Area
-
- Tape Around: Tear off 12–18 inch strips of masking tape. Stick them along the headlight’s edge, overlapping the lens by 1/4 inch and pressing onto the car body—cover all sides (top, bottom, sides). Add a second layer for safety.
-
- Protect More: Tape over nearby paint, trim, or bumper if close—sanding dust travels. A 2-inch border is plenty.
-
- Why It Matters: Sandpaper or polish on paint scratches it—repairing that’s a headache. Tape’s your shield—cheap insurance.
Step 4: Sand the Headlights (Wet Sanding)
-
- Start Coarse: Grab 800-grit sandpaper (or 600 for really bad haze). Soak it in water 1–2 minutes—wet sanding cuts dust and scratches. Spray the lens too—keep it dripping.
-
- Sand Sideways: Rub in straight lines (left to right) with medium pressure—cover the whole lens evenly. Takes 5–10 minutes—lens turns white/milky as haze lifts. Spray water every minute to stay wet.
-
- Step Up Grits: Rinse the lens, switch to 1000-grit, and sand up/down (opposite direction). Then 2000-grit for a final pass—3–5 minutes each. Rinse between grits—lens gets smoother, less cloudy.
-
- Check Progress: Dry with a cloth—should look uniform, not shiny yet. Feel it—smooth as glass, no grit. Rough spots? Redo that grit.
-
- Why It Matters: Sanding strips the oxidized layer—coarse grits remove damage, finer ones prep for polish. Wet keeps it gentle—dry sanding gouges.
Step 5: Clean After Sanding
-
- Alcohol Wipe: Pour rubbing alcohol on a microfiber cloth—damp, not soaked. Wipe the lens thoroughly—cuts dust, grease, and water spots. Takes 1–2 minutes.
-
- Dry Fully: Use a dry cloth to remove streaks—lens should look clean and dull, no haze left.
-
- Why It Matters: Sanding dust sticks—polish won’t work over it. Alcohol ensures a blank slate for clarity.
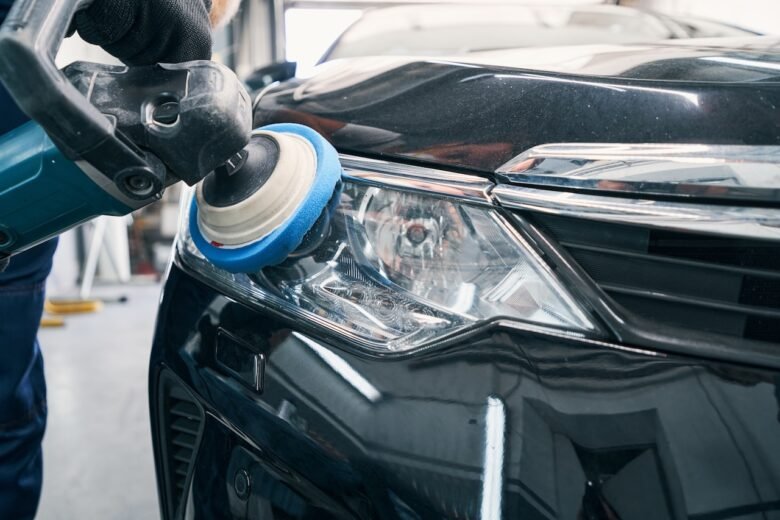
Step 6: Polish the Headlights
-
- Apply Polish: Squeeze a quarter-sized blob of polishing compound onto a microfiber cloth (or drill pad if using). Rub it onto the lens in tight circles—firm pressure, like waxing a car. Work 5–10 minutes per light—lens starts clearing.
-
- Buff Off: Wipe excess with a clean cloth—check for clarity. Still cloudy? Add more polish and repeat. Should gleam like new glass.
-
- Why It Matters: Polish smooths micro-scratches from sanding, restoring transparency. It’s the magic step—patience here shines.
Step 7: Apply UV Sealant
-
- Seal It: Use the kit’s sealant (wipe-on, per instructions) or spray a thin, even layer of UV clear coat—hold 6–8 inches away. Let dry 10–30 minutes (check label—humid days take longer).
-
- Double Up: Add a second coat after drying—wipe or spray lightly, cure 1–2 hours. Don’t touch till dry—smudges ruin it.
-
- Why It Matters: Bare plastic re-oxidizes fast—sealant blocks UV and weather, keeping lenses clear for years, not months.
Step 8: Remove Tape and Final Clean
-
- Peel Carefully: Pull tape off slowly at an angle—avoids lifting paint. Check edges—no polish or sealant on the body.
-
- Wipe Around: Dampen a cloth with water and wipe around the lens—removes stray dust or compound. Dry with a fresh cloth.
-
- Why It Matters: Clean edges look pro—leaving gunk on paint dulls your win.
Step 9: Test and Inspect
-
- Daylight Check: Turn on headlights—beams should look bright and even against a wall. Compare to before—night-and-day difference.
-
- Night Drive: Test at dusk or night—visibility should feel like new headlights, no dim patches.
-
- Spot-Check: See haze or scratches? Redo polish/seal on that spot. All clear? You’re done!
-
- Why It Matters: Proves your work—safety and pride in every beam.
Tips for a Stellar Job
-
- Go Slow: Rushing sanding leaves swirls—take your time for a mirror finish.
-
- Test One First: Try on one headlight—tweak if it’s too slow or rough.
-
- Keep It Up: Wash headlights monthly, re-seal yearly—stays clear longer.
-
- Bonus Upgrade: Swap old bulbs for brighter ones (e.g., LED)—maximizes your fix.
Troubleshooting
-
- Still Hazy: Too light sanding—start at 600-grit, work up. Rinse better between grits.
-
- Scratches Left: Missed a grit—back to 1000, then 2000, polish harder.
-
- Fades Fast: Weak sealant—reapply with UV-rated clear coat.
Household Hacks (Light Haze)
-
- Toothpaste: Rub non-gel toothpaste on with a cloth—5 minutes of circles, rinse. Mild fix—seal after.
-
- Baking Soda + Vinegar: Mix a paste, scrub with a sponge, rinse. Cheap but short-lived—add sealant.