Your car’s air intake system is crucial for delivering clean, oxygen-rich air to the engine, improving combustion efficiency, and ultimately enhancing performance. Whether you’re replacing an old air intake system or upgrading to a high-performance cold air intake, this guide will walk you through the entire process. With the right tools and a systematic approach, you can successfully install a new air intake system in your vehicle without needing professional help.
Tools and Materials Needed
Before you start, gather the following tools and materials:
- New air intake system (stock or aftermarket cold air intake, ensure compatibility with your car model)
- Screwdrivers (flathead and Phillips for removing clamps and screws)
- Socket wrench set (for loosening and tightening bolts)
- Pliers (for removing stubborn clamps and hoses)
- Adjustable wrench (for various bolt sizes)
- Ratchet and extension bars (for hard-to-reach areas)
- Hose clamps (extra in case replacements are needed)
- Torque wrench (optional but recommended for precision tightening)
- Work gloves and safety goggles (to protect hands and eyes from debris)
- Clean rag or shop towel (to wipe off dirt and dust)
- Automotive-safe cleaner (for intake components and throttle body cleaning)
- Zip ties or hose securing bands (for securing loose wires and hoses)
Step 1: Prepare Your Vehicle
- Park on a Level Surface: Ensure the car is parked on a flat surface to prevent rolling or shifting while working. Engage the parking brake for extra safety.
- Turn Off the Engine: Let the engine cool down for at least 30 minutes before working under the hood. Working on a hot engine can cause burns and discomfort.
- Disconnect the Battery: Unplug the negative terminal of the battery to prevent any electrical shorts or accidental starts while working on the intake system. Use a wrench to loosen the terminal and carefully set it aside where it won’t make contact with any metal surfaces.
- Gather Your Tools Nearby: Organize your tools and new air intake parts to avoid unnecessary interruptions during the installation process.
Step 2: Remove the Old Air Intake System
- Locate the Air Intake System: Open the hood and find the air intake system, typically located near the engine. It includes the air filter housing, intake tubing, and in some cases, a mass airflow sensor (MAF sensor).
- Unplug Sensors and Hoses:
- Carefully disconnect the MAF sensor (if equipped) by unclipping the electrical connector. Be gentle to avoid damaging the sensor.
- Identify any vacuum hoses connected to the intake tubing. Label them if necessary for easy reconnection later.
- Loosen Clamps and Bolts:
- Use a screwdriver or socket wrench to loosen the clamps securing the air intake tube to the throttle body.
- If the air filter housing is bolted down, remove the bolts with a wrench or socket set.
- Remove the Airbox and Tubing:
- Lift out the air filter housing and intake tubing.
- If your intake has a heat shield, unscrew and remove it as well.
- Inspect the throttle body for any dirt buildup. If it appears dirty, use a throttle body cleaner and a rag to clean it before installing the new intake.
Step 3: Install the New Air Intake System
- Position the New Intake Tube:
- Place the new intake tube in the same orientation as the old one. Ensure that it aligns properly with the throttle body and air filter location.
- If upgrading to a cold air intake, ensure it routes correctly, often leading to a lower position in the engine bay to draw in cooler air. Some models may require additional brackets for support.
- Connect the MAF Sensor and Hoses:
- Reconnect the MAF sensor if applicable, ensuring the wiring is properly secured and free from strain.
- Attach any vacuum hoses to their designated ports. If the new intake has different port positions, refer to the manufacturer’s instructions for proper reconnection.
- Secure the Air Intake Tube:
- Use the provided hose clamps to secure the intake tube to the throttle body.
- Tighten the clamps firmly but avoid over-tightening, as this could damage the tube or throttle body.
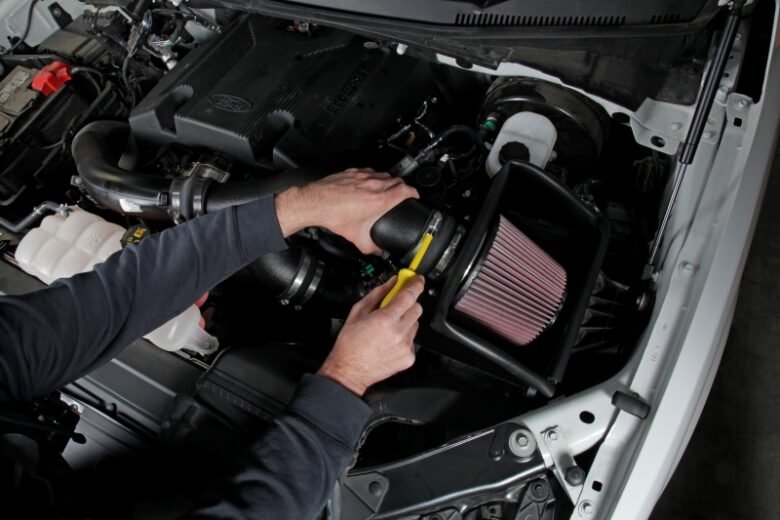
- Install the Air Filter:
- Attach the air filter to the intake pipe and secure it using a clamp. Ensure it is positioned correctly for optimal airflow.
- If your system includes a heat shield, install it now to help block excess engine heat from affecting the intake temperature.
- Double-Check All Connections:
- Ensure all bolts, clamps, and sensor connections are securely fastened before proceeding.
- Zip-tie any loose wires or hoses to keep them from moving around while driving.
Step 4: Reconnect the Battery and Test the Installation
- Reconnect the Negative Battery Terminal: Tighten it securely with a wrench.
- Start the Engine:
- Let the engine idle for a few minutes to allow the ECU (Engine Control Unit) to adjust to the new intake.
- Listen for any unusual sounds such as hissing or rattling, which could indicate a loose connection.
- Check for Air Leaks:
- Gently wiggle the intake components to ensure stability.
- If needed, tighten any loose clamps or bolts to prevent unfiltered air from entering the engine.
Step 5: Test Drive and Final Inspection
- Take the Car for a Short Drive:
- Accelerate gently to check if the throttle response has improved.
- Listen for any abnormal noises that might suggest improper installation.
- Monitor Performance:
- A properly installed intake should result in smoother acceleration and, in some cases, improved fuel efficiency.
- If the check engine light comes on, double-check sensor connections and hose fittings.
Maintenance Tips for Your New Air Intake System
- Regularly Check the Air Filter:
- Clean or replace it every 10,000-15,000 miles (or as recommended by the manufacturer) to maintain performance.
- Inspect for Loose Connections:
- Periodically check clamps, hoses, and sensor connections to prevent issues such as unmetered air leaks.
- Clean the Intake Tube:
- Wipe down the tubing to remove dirt buildup and keep airflow unrestricted.
- Monitor Engine Performance:
- If you notice a drop in performance, recheck the intake system for leaks or clogs.
Conclusion
Installing or replacing your car’s air intake system is a straightforward DIY project that can enhance engine performance and fuel efficiency. By following this step-by-step guide, you can confidently upgrade your vehicle’s intake system without professional assistance. With regular maintenance, your new air intake will keep your engine running smoothly for years to come. Whether you opt for a stock replacement or a performance upgrade, proper installation ensures optimal gains in power and efficiency.