The ignition coil is a critical component in your vehicle’s ignition system, responsible for converting the battery’s voltage into the high voltage needed to ignite the fuel-air mixture in the engine. A faulty ignition coil can cause misfires, rough idling, poor fuel economy, and even prevent your car from starting. Fortunately, replacing a faulty ignition coil is a relatively simple task that most car owners can do themselves with the right tools and guidance.
In this comprehensive guide, we’ll walk you through the step-by-step process of diagnosing, removing, and replacing a faulty ignition coil, ensuring your vehicle runs smoothly again.
Tools and Materials Needed
Before you begin, gather the following tools and materials:
- New ignition coil (ensure it matches your vehicle’s make and model)
- Socket wrench set (including appropriate extensions and adapters)
- Screwdrivers (flathead and Phillips)
- Torque wrench (optional, but recommended to avoid over-tightening)
- Dielectric grease (for better electrical conductivity and moisture prevention)
- Protective gloves and safety glasses (to protect hands and eyes from debris and electrical hazards)
- Vehicle service manual (for specific instructions related to your car model)
- OBD-II Scanner (to confirm and clear diagnostic codes after replacement)
Step 1: Diagnosing a Faulty Ignition Coil
Before replacing the ignition coil, confirm that it is indeed the cause of your engine trouble. Here are some common signs of a faulty ignition coil:
- Check Engine Light: If your dashboard’s check engine light is illuminated, scan the error codes using an OBD-II scanner. A code like P0351-P0356 indicates an ignition coil issue.
- Engine Misfires or Stalling: If your car hesitates, sputters, or misfires while accelerating, it could be due to a failing ignition coil causing inconsistent sparks.
- Rough Idling: The engine may feel unstable, vibrate excessively, or sound irregular at idle.
- Reduced Fuel Efficiency: A bad ignition coil causes incomplete combustion, leading to increased fuel consumption.
- Car Won’t Start: In severe cases, the engine may not start at all due to a complete lack of spark.
- Backfiring or Exhaust Smoke: A failing coil may result in unburned fuel igniting in the exhaust system, causing loud pops or excessive smoke.
If you observe these symptoms and confirm the fault with an OBD-II scanner, proceed to the next steps.
Step 2: Preparing for the Replacement
- Park the Vehicle on a Level Surface: Ensure the car is on a stable and flat surface. Engage the parking brake to prevent any movement while working.
- Turn Off the Engine and Let It Cool: Ignition coils can get very hot during operation. Wait at least 30 minutes before working on them to avoid burns.
- Disconnect the Battery: Remove the negative terminal of the battery to prevent electrical hazards and accidental sparks.
- Gather Your Tools: Ensure all tools and the new ignition coil are within reach before starting.
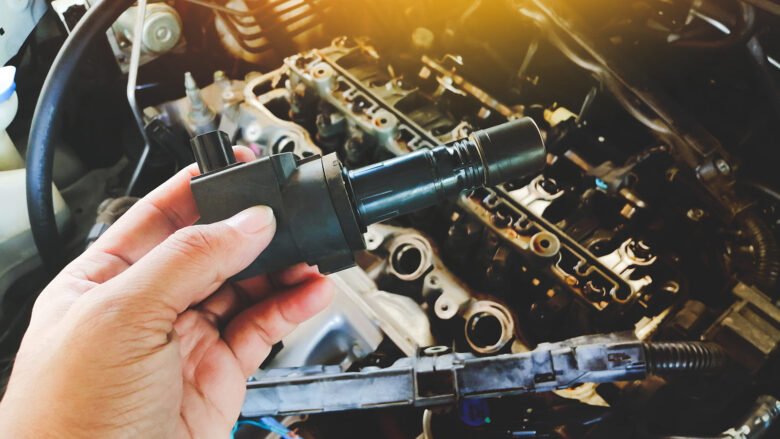
Step 3: Locating the Ignition Coil
The ignition coil is usually found on top of the engine, near the spark plugs. Some vehicles have a single coil pack, while others have individual coil-on-plug (COP) setups.
How to Locate It Based on Your Vehicle Type:
- Coil-on-Plug (COP) System: Each spark plug has its own ignition coil mounted directly on top. These are common in modern cars.
- Distributor-Based Ignition System: Older vehicles may have a single ignition coil connected to a distributor, which then directs the spark to each cylinder.
- Coil Pack System: Some engines use a coil pack that controls multiple cylinders at once.
Refer to your vehicle’s manual to identify the exact location and type of ignition coil you have.
Step 4: Removing the Faulty Ignition Coil
- Remove Any Covering Components: Some vehicles have an engine cover that needs to be removed to access the ignition coils. Use a socket wrench to unbolt and remove the cover.
- Identify the Faulty Coil: If your vehicle has multiple ignition coils, determine which one is faulty using the OBD-II scanner or by unplugging coils one at a time while the engine is running.
- Unplug the Electrical Connector: Gently press the tab on the ignition coil’s connector and pull it out. Avoid using excessive force to prevent damage.
- Remove the Coil Retaining Bolt: Use a socket wrench to unscrew the bolt holding the ignition coil in place. Be careful not to drop it into the engine bay.
- Extract the Ignition Coil: Carefully pull the ignition coil out. If it’s stuck, gently wiggle it while pulling. Avoid excessive twisting, as this may damage the boot.
Step 5: Installing the New Ignition Coil
- Apply Dielectric Grease: Before inserting the new coil, apply a small amount of dielectric grease inside the coil boot. This helps improve conductivity and prevents moisture buildup, which can lead to misfires.
- Insert the New Coil: Align the new ignition coil with the spark plug and gently push it into place until it sits firmly.
- Secure the Coil with the Retaining Bolt: Use a socket wrench to tighten the bolt snugly but avoid over-tightening, which may damage the coil or mounting bracket.
- Reconnect the Electrical Connector: Plug the wiring connector back into the new ignition coil until it clicks into place.
- Reattach Any Covering Components: If you removed an engine cover, reinstall it and secure it with bolts.
Step 6: Testing the New Ignition Coil
- Reconnect the Battery: Reattach the negative battery terminal.
- Start the Engine: Turn the ignition key and start the engine. Listen for smooth operation.
- Check for Error Codes: Use an OBD-II scanner to clear any previous fault codes and ensure no new codes appear.
- Test Drive the Car: Take the vehicle for a short drive to confirm smooth acceleration and normal engine performance. Monitor for any hesitation, misfires, or unusual behavior.
Step 7: Final Checks and Maintenance Tips
- Inspect Other Coils: If one coil failed, others may be close to failure. Consider replacing them all, especially in high-mileage vehicles.
- Regularly Check Spark Plugs: Worn-out spark plugs can put stress on ignition coils. Inspect and replace them as needed.
- Keep the Engine Clean: Dirt and oil buildup can lead to premature ignition coil failure. Clean the engine bay periodically.
- Use High-Quality Fuel: Poor-quality fuel can contribute to carbon buildup, which affects ignition performance.
Conclusion
Replacing a faulty ignition coil is a straightforward DIY task that can save you money on mechanic fees while ensuring your car runs smoothly. By following this step-by-step guide, you can safely diagnose, remove, and install a new ignition coil, restoring your engine’s performance. Always refer to your vehicle’s manual for specific instructions and part compatibility, and if you’re ever unsure, consult a professional mechanic.
With the right tools and careful attention, you’ll have your car running smoothly in no time!