Your car’s timing belt might be small, but it’s a powerhouse that keeps your engine ticking perfectly. This rubber belt synchronizes the crankshaft and camshaft, ensuring valves open and close at just the right moment. If it fails, your engine could stop—or worse, destroy itself in a clatter of bent valves and broken pistons. Changing it yourself is a DIY challenge that saves you big (shops charge $500-$1,000!), and with the right steps, you can do it like a pro.
In this guide, we’ll explain why the timing belt is a make-or-break part, then walk you through how to replace it, step by step. We’ll break down every move with plenty of detail—why you’re doing it, how to do it right—so you’re not just following a list, you’re mastering a fix. Grab your tools, and let’s keep your engine in sync!
Why the Timing Belt Is Crucial
Imagine your engine as an orchestra—the timing belt is the conductor. It’s a toothed rubber belt linking the crankshaft (which drives the pistons) to the camshaft (which opens the valves). This keeps everything in harmony: pistons rise, valves open, fuel ignites, and power flows. Why it’s crucial:
-
- Synchronization: Without it, valves and pistons crash—especially in “interference” engines (most modern cars).
-
- Prevention: A snapped belt can mean a dead engine or a $2,000+ rebuild.
-
- Efficiency: A worn belt slips, cutting power and fuel economy.
Most belts last 60,000-100,000 miles, but waiting for it to break is a gamble you don’t want to take. Replacing it on time is cheaper than repairing the chaos it leaves behind.
How Often Should You Change Your Timing Belt?
-
- Manufacturer’s Schedule: Check your owner’s manual—typically 60,000-100,000 miles or 5-7 years, whichever comes first. Some cars (e.g., Hondas, Toyotas) list exact intervals.
-
- Signs of Wear: Squealing from the engine, misfires, or visible cracks/tears (if you can see it). Don’t wait for these—replace proactively.
-
- Conditions: Hot climates, stop-and-go driving, or towing shorten its life—err on the early side if you push your car hard.
Skipping this isn’t an option—unlike oil changes, there’s no “little longer” grace period. A failed belt stops you cold.
Tools and Materials You’ll Need
This job’s big, so gather everything before starting. Here’s the lineup, with why you need each.
-
- Timing Belt Kit: New belt, often with tensioner and idler pulleys (buy a kit—old parts fail too). Match your car’s make, model, year, engine.
-
- Wrench Set: Loosens bolts (8mm-17mm common—check your car).
-
- Socket Set with Ratchet: For tight spots and bigger bolts (e.g., crankshaft pulley).
-
- Torque Wrench: Tightens to exact specs—crucial for tension and mounts.
-
- Screwdriver: Flathead/Phillips—for clamps or covers.
-
- Jack and Jack Stands: Lifts the car safely—engine bay access needs space.
-
- Breaker Bar: Busts loose the crankshaft bolt (it’s tight!).
-
- Pulley Puller: Removes the crankshaft pulley if stuck (rentable).
-
- Timing Light: Optional—checks alignment post-install.
-
- Coolant: To refill (some cars need draining—match your spec).
-
- Drain Pan: Catches coolant or drips.
-
- Gloves: Protects from grease, heat, sharp edges.
-
- Safety Glasses: Shields eyes—bolts fly, fluids splash.
-
- Rags/Shop Towels: Wipes messes—oil’s everywhere.
-
- Marker or Chalk: Marks timing positions—saves guesswork.
-
- Owner’s Manual: Your car’s map—bolt sizes, torque specs, timing marks.
Optional:
-
- Camshaft/crankshaft lock tools (car-specific—eases alignment).
-
- Engine hoist (if water pump’s out—head gasket territory).
DIY Steps to Change Your Timing Belt
This is a big job—takes 4-8 hours, depending on your car and skill. We’ll assume a front-wheel-drive, interference engine (common setup)—adjust for your model with the manual.
Step 1: Prep Your Car and Workspace
-
- Why: Safety and access are everything—rushing risks ruin.
-
- How: Park on flat ground, set the parking brake, engine off, cooled completely (hot parts burn—wait hours if driven). Pop the hood, secure it. Jack up the front, support with stands—never work under a jack alone. Disconnect the battery—negative (-) terminal first (10mm wrench), tuck it aside—no sparks. Wear gloves, glasses—sharp edges lurk.
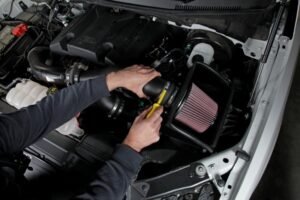
Step 2: Access the Timing Belt
-
- Why: It’s buried—gotta strip away covers and parts.
-
- How: Remove engine covers (plastic clips or screws—screwdriver). Unbolt the accessory belts (serpentine)—find the tensioner, turn with a wrench (e.g., 13mm), slip it off (sketch its path). Remove the passenger-side wheel and splash shield (socket set)—exposes the lower pulley. Unbolt the timing belt cover (often 10mm bolts)—lift it off, revealing the belt, pulleys, tensioner.
Step 3: Align the Timing Marks
-
- Why: Wrong timing wrecks the engine—marks are your lifeline.
-
- How: Find the crankshaft and camshaft sprockets—manual shows their marks (notches or dots). Turn the crankshaft with a breaker bar on the pulley bolt (clockwise)—line up the crank mark with its pointer (often “0” or TDC—top dead center). Camshaft mark aligns too (sprocket to housing mark). Mark them with chalk if faint. Don’t force it—pistons hit valves if off. Double-check—misalignment’s a disaster.
Step 4: Drain Coolant (If Needed)
-
- Why: Water pump’s often replaced with the belt—coolant’s in the way.
-
- How: Check your kit—includes a pump? Place a drain pan under the radiator, twist the petcock (bottom) or remove the lower hose (messier). Drain fully—catch it, don’t spill (toxic!). Skip if no pump swap—some belts dodge this.
Step 5: Remove the Old Timing Belt
-
- Why: Out with the worn—makes room for new.
-
- How: Loosen the tensioner—bolt or spring (wrench, often 14mm)—turn counterclockwise, release pressure. Slip the belt off—note its path (crank, cam, tensioner, idlers). Inspect it—cracks, missing teeth, glaze? It’s toast. Unbolt the tensioner and idlers if replacing (kit parts)—socket set, save bolts.
Step 6: Replace Related Components
-
- Why: Old tensioners/pumps fail soon—do it all now.
-
- How: Bolt on the new tensioner and idlers (hand-tight, then torque—e.g., 20-30 ft-lbs, per manual). Water pump? Unbolt the old (socket set), scrape gasket (plastic tool—no scratches), fit the new with its gasket, torque bolts (e.g., 15 ft-lbs). Clean surfaces—dirt leaks.
Step 7: Install the New Timing Belt
-
- Why: Fresh belt, perfect sync—heart of the fix.
-
- How: Check marks—still aligned? Route the new belt—crank sprocket first, up to camshaft, around idlers, tensioner last (manual’s diagram helps). No slack—keep it snug. Tensioner’s key—turn or pull per type (spring auto-sets, bolt needs adjusting—watch slack). Spin the crank two full turns (breaker bar)—marks still line up? Perfect.
Step 8: Reassemble the Engine
-
- Why: Puts it back together—tight seals the deal.
-
- How: Bolt the timing cover back (socket set—snug, not over-tight). Reinstall the crankshaft pulley—breaker bar, torque to spec (e.g., 100-150 ft-lbs—huge!). Refit accessory belts (tensioner trick), splash shield, wheel (lug nuts—torque later, e.g., 80 ft-lbs). Refill coolant if drained (funnel, to “Full”—bleed air per manual).
Step 9: Test Your Work
-
- Why: Proves it’s synced—no bent valves, please!
-
- How: Reconnect the battery (+ then -). Start the engine—cranks normal? Runs smooth? No squeals or knocks? Let it idle 5-10 minutes—check for leaks (coolant/oil). Take a short drive—power feels right? Timing light (optional) confirms marks. Success!
Step 10: Final Checks and Cleanup
-
- Why: Ensures no loose ends—finishes strong.
-
- How: Recheck fluid levels—top off oil/coolant. Tighten wheel lugs if lifted. Wipe tools, dispose of old belt/coolant (recycle at auto stores). Drive a week—listen, watch for trouble. You’re done!
DIY Tips for Success
-
- Mark Everything: Chalk or tape—don’t trust memory.
-
- Torque It: Uneven bolts slip belts—use that wrench.
-
- Kit Up: Belt-only’s risky—tensioners/pumps fail next.
-
- Double-Check Marks: One tooth off bends valves—verify post-install.
-
- Helper Helps: Extra hands hold pulleys—saves swearing.
DIY Mistakes to Avoid
-
- Hot Engine: Burns or warped parts—cool it first.
-
- Wrong Belt: Mismatched teeth fail—exact match only.
-
- Forced Turning: Crank off-mark? Valves smash—go slow.
-
- Loose Tension: Slips or snaps—set it right.
-
- Skipping Pump: Old pumps leak soon—replace while in there.
DIY Troubleshooting
-
- No Start: Marks off? Redo alignment—careful crank turn.
-
- Squealing: Tension wrong or belt misrouted—adjust.
-
- Overheating: Air in coolant—bleed it out (manual’s way).